Links for Beginners in LiveCode Programming (Update)

Here’s an updated list of websites for starting LiveCode programmers.

http://h.webring.com/hub?ring=runtimerevoluti1
http://revolution.byu.edu/indexgeneric.php (wow!)
http://www.runrev.info
http://www.revjournal.com/tutorials/
http://support.runrev.com/scriptingconferences/
http://derbrill.de/developers.php?lang=en
http://lists.runrev.com/pipermail/use-revolution

This is the collection as of November 2012. Please, tell me know if you know about any links that belong in this collection.

Halloween Discount on Installer Maker

Today and only today Economy-x-Talk offers a 33% discount on new Installer Maker licenses. This means that you pay €26.13 instead of €39.00.

Installer Maker creates installers for Windows and Mac OS X. Installer Maker comes in two versions. There is a plugin for LiveCode, which lets you build an installer with only LiveCode and no additional software. A standalone version, which doesn’t require LiveCode, is also available.

Note: it is recommended to read the feature list on the website and download and test the software before purchasing. If you have any questions, feature requests or bug reports, please contact me.

Go to http://qery.us/za for more information and downloads. The discount also applies to the standalone version of Installer Maker, which you can find at http://qery.us/oc. To purchase a license, don’t click on the PayPal button on the website but open http://qery.us/397 (Plimus) in your browser and enter the coupon code HALLOWN1.

Color Converter 4.3 Includes a New Color Picker Tool!

Economy-x-Talk has released Color Converter 4.3. Color Converter is a low-cost colour conversion tool for professional designers and everyone who needs to work with colour on a computer. This tool encodes colour values from and to any of the following colour spaces: CMYK, H.Lab, HEX/HTML, HSV, RAL, RGB, XYZ and X11 Colour Names. Additionally, it provides an RGB-based brightness value.

Picker

Color Converter can also analyse any area of your (primary) screen and display a colour histogram based on the results of the analysis. A long list of X11 colour names is easy to search and colour names can be converted to all other colour spaces with a click of the mouse. In version 3 we added the ability to resize pictures. The current new release adds four colour filters, allowing you to export the red, green, blue and gray channels of your picture files.

New in Color Converter 4.3 is the ability to pick a colour from anywhere on the screen, using the new color picker tool at the bottom of the Color Converter window. we have also fixed a problem, which occurred when converting a RAL value to other colour spaces.

Color Converter 4.3 can be downloaded from http://www.color-converter.com and is available for MS Windows, Mac OS X and Linux.

Redirect/Recording Sound from Built-in Speakers

How to record the sound that comes from your internal or external speakers?

Suppose, you’re making a podcast and you want to combine sounds from your computer, e.g. music, together with spoken sound recorded by means of a microphone. I had a similar situation and needed to record the sound that is normally played through the external speakers. HyperStudio and some freeware allowed me to do this.

What you need:
HyperStudio 5 Virtual Audio Device
Audio Midi Setup (in your Utilities folder)
Soundflower
LineIn

Most people will first think of Audio Hijack for this kind of tasks, but it won’t do the job.

Step 1: Download and Install

Install Roger Wagner’s HyperStudio 5: http://www.hyperstudio.com
Make sure that the Virtual Audio Device is also installed is available in the Sound system preferences.

Install Soundflower: http://code.google.com/p/soundflower/
Soundflower is a free application. After installation, you should see a Soundflower symbol in the upper-right of your menubar. Don’t worry if your system reports that an extension couldn’t be loaded. It will work anyway.
Read the entire file ReadMe.rtf (it is brief) and follow the instructions to install.

LineIn: http://www.rogueamoeba.com/freebies/
LineIn is also a free application. Open the disk image and copy the app to your applications folder.

Step 2: Setting up the software

We start with Audio Midi Setup. You’ll find this utility in the Utilities folder of your Applications folder. Select the HyperStudio 5 Virtual Audio Device in the list on the left and choose “Use this device for sound output” and “Play alerts and sound effects through this device” from the menu (see picture). After choosing these items, they will appear as disabled in the menu.

Audio_midi_setup

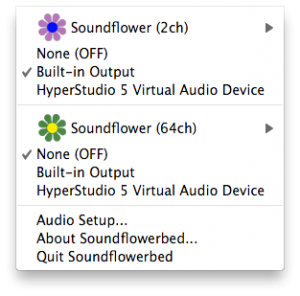
In the menubar, open the Soundflower menu and select Built-in Output in the Soundflower (2ch) section. Keep the Non (OFF) item in the Soundflower (64ch) section selected.

Screen_shot_2012-10-02_at_15

Open LineIn and select HypoerStudio 5 Virtual Audio Device in the Input From menu and Soundflower (2ch) in the Output To menu.

This explains why I use HyperStudio. I can’t choose my external speakers as input in LineIn, which creates the need for using another sound driver. HyperStudio installs an additional sound driver, HyperStudio 5 Virtual Audio Device, which I can select as output in the Sound panel of the system preferences and as an Input in LineIn.

0screen_shot_2012-10-02_at_15

Open the Sound preferences panel and go to the Output tab. Make sure that HyperStudio 5 Virtual Audio Device is selected and keep the Output volume somewhere in the middle (you might increase the output volume if you think that the final result is too soft). Now open the Input tab and select the Internal microphone (Built-in).

Screen_shot_2012-10-02_at_17

Step 3: Record

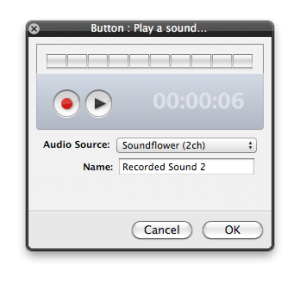
Create a new button in HyperStudio. Double-click the button if no Inspector window is visible yet. Select Play a Sound from the Actions panel and click on Record a Sound. Click the red button to start recording. Now you might play some music on iTunes, a song on Youtube or a game with a cool theme. Press the button again (which now has changed into a black square) to stop recording. Press the black triangle to check that you have actually recorded something.

Screen_shot_2012-10-02_at_17

Make sure that Soundflower (2ch) is selected as the Audio Source. Click on OK to go to the next panel and click on OK again. If you now choose the Browse tool and click on the button, you should hear your recording.

Step 4: set everything back to normal

You can now choose Quit Soundflowerbed from the Soundflower symbol in the menubar. This will disable all sound. In Audio Midi Setup, assign both types of sound output to Built-in Output instead of HyperStudio 5 Virtual Audio Device. Now you can hear all sounds again. In the Sound panel of the system preferences, you will want to make sure that Headphones or Internal Speakers are selected on the Output tab.

I tested this with Mac OS X 10.6.8 (Snow Leopard) and HyperStudio 5.2.1372. With a little additional tweaking, it also works to record Skype sessions.

Please, leave a comment if you have questions or know a better way to do this.

How to block trending articles in Facebook?

I kept getting those pesky trending articles in Facebook, which are actually advertisements. I can’t confirm it, but I think that companties pay Facebook to have their articles posted to your timeline as soon as you or one of your (remote) friends gets on their website. This feature is in my top 3 of most-hated Facebook features.

If you look closely at the trending article post in your timeline, you will se the name of an app, e.g. Yahoo, MSNBC or The Independent. Those aren’t websites but Facebook apps and thus you can block them.

Click on the little white triangle next to the Home menu (in the top-right of the Facebook page).

Screen_shot_2012-07-08_at_21

and choose Privacy Settings from the menu.

0screen_shot_2012-07-08_at_21

Click on the link Manage Blocking at the bottom of the page.

1screen_shot_2012-07-08_at_21

You need to scroll down to the “BLock Apps” section. You willsee a field, where you can write the name of an app. If you write Yahoo, a list of Yahoo-options will appear and you can choose the one that annoys you. As soon as you choose an option, the app will no longer post to your timeline.

Screen_shot_2012-07-08_at_21

As you can see, I block everything that isn’t posted directly by a friend, app or page that I added to my timeline myself.

Please, write a comment to this blog post if you know a better solution.

Use Ashot to Capture Apps running on Android Device

I’m developing a web app for a customer of Economy-x-Talk and needed a way to record demos for the customer. The web app will mostly run on Android and I was trying to make screenshots and videos with my Android tablet but couldn’t get it to work without hacking around in places that I’d rather leave alone at this point.

So, I searched the net and found Ashot. Ashot appears to work almost entirely “just like that” on my Mac OS X machine. This is what I did.

1) First I downloaded Ashot for Mac.

2) Next I downloaded and installed the Android SDK (actually, I had it installed already) and copied the file /Developer/android-sdk-mac_x86/platform-tools/adb to /Developer/android-sdk-mac_x86/tools/adb.
3) On my Android, I opened Settings/Apps, activated Unknown Sources (I don’t know if this is really necessary but it worked for me) and selected Settings/Apps/Development where I activated USB Debugging and Stay Awake.

4) Then I connected my Android tablet to one of the two on-board USB ports of my Mac

5) I turned on the tablet and fired up Ashot-1.1.jar and chose Set Capture Folder from the file menu and set it to my Downloads folder. Later I changedit to another folder inside my Downloads folder. I suppose you might want to use a folder inside your documents folder.

6) I chose Set Android SDK Folder from the File menu and opened /Developer/android-sdk-mac_x86/.

7) I restarted Ashot-1.1.jar and it connected to my tablet automcatically.

Screen_shot_2012-06-28_at_11

The app also has a few downsides. Sounds are not recorded and it only captured PNG files.

If you start a “movie” capture, it just starts making many PNG files and you need to make a movie out of it yourself. You can use PowerPoint, iPhoto, HyperStudio and even GIMP to make movies or GIF animations.

The default background is black. You can change it in the Options window, but the change has an effect only after restarting Ashot.

The app is rather slow and won’t let you make a smoothly playing movie, but I think it is sufficient for a live demo with a beamer for example and at least this app lets you make screenshots of apps running on your device.

Download an application package here

Launcher X – a classic dock replacement

Remember the Mac OS Classic application Launcher? Launcher X is a replacement for everyone who still isn’t used to the dock of Mac OS X —or for everyone who likes to have some fun with a Classic feature on Mac OS X.

Screen_shot_2012-05-14_at_03

If you don’t know about Mac OS 9, you might want to know what Launcher X does. Just drag any file, application of folder into the Launcher X window and a link to the item is created. When you click once on the icon in Launcher X, the application, folder or file with open right-away.

Because Launcher X has the ability to create multiple groups of icons, you can store many more icons in Launcher X then in the dock of Mac OS X. Moreover, you can organise your groups the way you like. You’re not forced to keep applications on the left and folders and files on the right, as with the OSX dock.

Launcher X was created with Livecode. If you are interested in Launcher X, just drop us a note. Go to http://economy-x-talk.com and fill out the contact form. We will reply with a download link.

How to make Internet Explorer start with blank page in Windows 8

Internet Explorer has the annoying habit to start with the MSN homepage, even if you tell it not to do so. Here’s how to make sure that IE doesn’t display the MSN homepage on startup anymore.

First, right-click in the tool bar of the Internet Explorer window (to the right of the address bar). A menu appears as displayed in the picture below.

Screen_shot_2012-04-28_at_17

If no checkmark is displayed in front of menu item “Menu bar” then click on this menu item to make the checkmark appear. A menubar will become visible in the Internet Explorer window.

0screen_shot_2012-04-28_at_17

Open the Tools menu of Internet Exploror and choose the “Internet options” menu item. A new window will appear now, with the name Internet Options.

If the General tab is not active then click on the General tab at the top of the window. In the field in the Home page section, you will find a URL that leads to the MSN homepage. You might also find some other URLs. Delete all URL’s by clicking in the field once, typing Control-A followed by the Return key (or the Enter key). Now replace the deleted URL’s with “about:blank” (without quotes). Don’t leave the field empty, because Microsoft will still load a website for you if you don’t enter “about:blank”.

1screen_shot_2012-04-28_at_17

Now you can click on the OK button at the bottom of the window. Close and reopen Internet Explorer. Your new IE window should now open with a blank page.

Turn Off BTServer (Mac OS X)

Every time when I woke up my MacBook, the process BTServer started to run at 140% CPU power and the fan would blow like crazy. Looking for a solution, I found that this problem is quite common, but I couldn’t find complete instructions to solve this problem.

I searched my Mac for files with BTServer in their names and found com.apple.BTServer.txt among other names. The file is in a folder called launchDeamons, which gave me a clue.

The only website I could find, mentioning both the file and high CPU usage, is at: http://qery.us/1vu . Below follows what I did after reading the site.

First open folder /Developer/Platforms/iPhoneSimulator.platform/Developer/SDKs/iPhoneSimulator5.0.sdk/System/Library/LaunchDaemons/ and locate the file com.apple.BTServer.txt. Copy this file to your desktop. Before continuing, you might want to duplicate the file first.

Open it in TextEdit by right-clicking (or control-clicking) on it and choosing Open With>TextEdit from the popup menu. Find the text

<key>Disabled</key>
    <false/>

and change it into

<key>Disabled</key>
    <true/>

The website doesn’t mention it, but there is also a key KeepAlive containing

<key>SuccessfulExit</key>
        <true/>

I might be overdoing things, but I set this key to false too:

<key>SuccessfulExit</key>
        <false/>

Now save and close the file. Drag the file back into aforementioned folder. When you’re asked if you want to replace, click on Replace. When you’re asked to authorize this action, allow it and enter your password when asked for.

At first this didn’t work for me, but after I restarted the Mac, the problem seemed to have gone away.