Category Archives: Uncategorized

Installer Maker Plugin 1.7.15 for LiveCode

We are happy to announce a new version of the Installer Maker Plugin.

In response to a number of recent bug reports from our customers, we have made the following changes:

• no more delay when going to a different screen (this delay now occurs right after you open the plugin/application and should now be hardly noticeable)
• we fixed a bug, which made the “Use None” button of the Picture tab of the Appearance screen dysfunctional
• if an installer for OSX was created on Windows, the installer will set an executable bit for any *.app folders after all files have been written to disk

Installer Maker Plugin can be downloaded from our homepage. Licenses can be purchased on the same website.

Installer Maker 1.7.14.S

It is a pleasure to announce a new version of the standalone edition of Installer Maker. Installer Maker is a tool for users of RAD tools, which allows you to quickly wrap your software in an installer for distribution.

Strom_installer_window

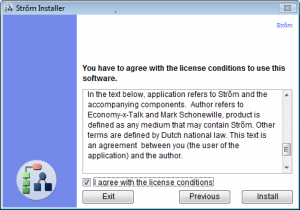
License Screen of the Installer Window

Installer Maker 1.7.14S contains all bug fixes and new features that have been added to the LiveCode plug-in since the release of IM 1.7.11S. Software that is installed on Mac OS X by an installer created on Windows now has its permissions set correctly (i.e. the software will actually run) and resource forks are now included. Altogether more than 50 bug fixes and new features have been implemented. A complete list of recent changes can be found on the website at http://installermaker.economy-x-talk.com and that’s where you will find downloads as well.

Screen_shot_2012-11-27_at_01

Installer Maker Window on Mac OS X 10.6.8

Installer Maker Plugin 1.7.14 for LiveCode and the standalone edition Installer Maker 1.7.14S are free for anyone who bought a license after 20 September 2012. An upgrade license can be purchased for only EUR 16.95 if your license is at most 1 year old. New licenses cost EUR 39.00. Licenses can be purchased at aforementioned website.

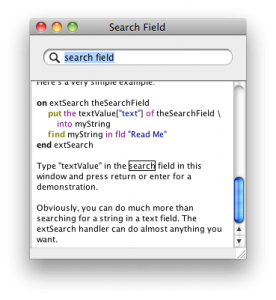
Search Field for LiveCode in OSX Style

This search field adjusts its size automatically to the size of its group. Use the pointer toolto select and resize the group.

Screen_shot_2012-11-23_at_01

You can copy this search field and paste it into your own stack. All required scripts are included.
When you type return or enter, the message extSearch is sent together with the long id of the searchfield (actually the group). This allows you to retrieve the textValue property of the search field.

You can get and set the textValue property. The textValue property has 4 possible keys: text,html,utf8, utf16 or rtf. Each key returns the respective text property. The format key is optional ifyou are retrieving or setting plain text (i.e. textValue[“text”] and textValue both work).

An overview of all of Economy-x-Talk’s products and services can be found at http://qery.us/sm and the search field control can be downloaded at http://qery.us/3am

“Where can I find information about Installer Maker?”

We got a request for information about Installer Maker, more specifically for instructions how to use it. We don’t have official documentation yet, but there are several places where you can find useful info. Currentl, there are the following options:

– a slightly old video tutorial at http://qery.us/39u
– a collection of blog posts with announcements, videos and hints at http://qery.us/39v
– the Read Me file http://qery.us/39w
– the tool tips in almost every element of Installer Maker’s interface

You can always contact support with your comments and questions.

How we make our website

We make our website with a very simple CMS. This tool automatically creates all files we need and we only need to add a title in the list on the left and enter the text and a few HTML tags.

Screen Recording.mov
Watch on Posterous

Recently, we needed a way to quickly find stray tags. We added a command line utility to validate the HTML code and a brief script that highlights in yellow all the HTML code that appears within one pair of tags. This is also useful to debug HTML code of other projects and thus we made a separate HTML editor with the same validating and highlighting features. Everything was scripted in LiveCode.

Links for Beginners in LiveCode Programming (Update)

Here’s an updated list of websites for starting LiveCode programmers.

http://h.webring.com/hub?ring=runtimerevoluti1
http://revolution.byu.edu/indexgeneric.php (wow!)
http://www.runrev.info
http://www.revjournal.com/tutorials/
http://support.runrev.com/scriptingconferences/
http://derbrill.de/developers.php?lang=en
http://lists.runrev.com/pipermail/use-revolution

This is the collection as of November 2012. Please, tell me know if you know about any links that belong in this collection.

Halloween Discount on Installer Maker

Today and only today Economy-x-Talk offers a 33% discount on new Installer Maker licenses. This means that you pay €26.13 instead of €39.00.

Installer Maker creates installers for Windows and Mac OS X. Installer Maker comes in two versions. There is a plugin for LiveCode, which lets you build an installer with only LiveCode and no additional software. A standalone version, which doesn’t require LiveCode, is also available.

Note: it is recommended to read the feature list on the website and download and test the software before purchasing. If you have any questions, feature requests or bug reports, please contact me.

Go to http://qery.us/za for more information and downloads. The discount also applies to the standalone version of Installer Maker, which you can find at http://qery.us/oc. To purchase a license, don’t click on the PayPal button on the website but open http://qery.us/397 (Plimus) in your browser and enter the coupon code HALLOWN1.

Color Converter 4.3 Includes a New Color Picker Tool!

Economy-x-Talk has released Color Converter 4.3. Color Converter is a low-cost colour conversion tool for professional designers and everyone who needs to work with colour on a computer. This tool encodes colour values from and to any of the following colour spaces: CMYK, H.Lab, HEX/HTML, HSV, RAL, RGB, XYZ and X11 Colour Names. Additionally, it provides an RGB-based brightness value.

Picker

Color Converter can also analyse any area of your (primary) screen and display a colour histogram based on the results of the analysis. A long list of X11 colour names is easy to search and colour names can be converted to all other colour spaces with a click of the mouse. In version 3 we added the ability to resize pictures. The current new release adds four colour filters, allowing you to export the red, green, blue and gray channels of your picture files.

New in Color Converter 4.3 is the ability to pick a colour from anywhere on the screen, using the new color picker tool at the bottom of the Color Converter window. we have also fixed a problem, which occurred when converting a RAL value to other colour spaces.

Color Converter 4.3 can be downloaded from http://www.color-converter.com and is available for MS Windows, Mac OS X and Linux.

Redirect/Recording Sound from Built-in Speakers

How to record the sound that comes from your internal or external speakers?

Suppose, you’re making a podcast and you want to combine sounds from your computer, e.g. music, together with spoken sound recorded by means of a microphone. I had a similar situation and needed to record the sound that is normally played through the external speakers. HyperStudio and some freeware allowed me to do this.

What you need:
HyperStudio 5 Virtual Audio Device
Audio Midi Setup (in your Utilities folder)
Soundflower
LineIn

Most people will first think of Audio Hijack for this kind of tasks, but it won’t do the job.

Step 1: Download and Install

Install Roger Wagner’s HyperStudio 5: http://www.hyperstudio.com
Make sure that the Virtual Audio Device is also installed is available in the Sound system preferences.

Install Soundflower: http://code.google.com/p/soundflower/
Soundflower is a free application. After installation, you should see a Soundflower symbol in the upper-right of your menubar. Don’t worry if your system reports that an extension couldn’t be loaded. It will work anyway.
Read the entire file ReadMe.rtf (it is brief) and follow the instructions to install.

LineIn: http://www.rogueamoeba.com/freebies/
LineIn is also a free application. Open the disk image and copy the app to your applications folder.

Step 2: Setting up the software

We start with Audio Midi Setup. You’ll find this utility in the Utilities folder of your Applications folder. Select the HyperStudio 5 Virtual Audio Device in the list on the left and choose “Use this device for sound output” and “Play alerts and sound effects through this device” from the menu (see picture). After choosing these items, they will appear as disabled in the menu.

Audio_midi_setup

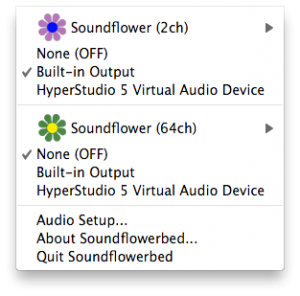
In the menubar, open the Soundflower menu and select Built-in Output in the Soundflower (2ch) section. Keep the Non (OFF) item in the Soundflower (64ch) section selected.

Screen_shot_2012-10-02_at_15

Open LineIn and select HypoerStudio 5 Virtual Audio Device in the Input From menu and Soundflower (2ch) in the Output To menu.

This explains why I use HyperStudio. I can’t choose my external speakers as input in LineIn, which creates the need for using another sound driver. HyperStudio installs an additional sound driver, HyperStudio 5 Virtual Audio Device, which I can select as output in the Sound panel of the system preferences and as an Input in LineIn.

0screen_shot_2012-10-02_at_15

Open the Sound preferences panel and go to the Output tab. Make sure that HyperStudio 5 Virtual Audio Device is selected and keep the Output volume somewhere in the middle (you might increase the output volume if you think that the final result is too soft). Now open the Input tab and select the Internal microphone (Built-in).

Screen_shot_2012-10-02_at_17

Step 3: Record

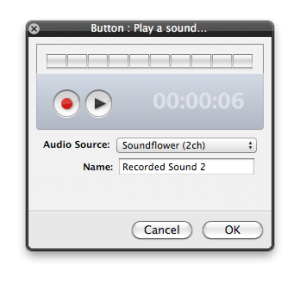
Create a new button in HyperStudio. Double-click the button if no Inspector window is visible yet. Select Play a Sound from the Actions panel and click on Record a Sound. Click the red button to start recording. Now you might play some music on iTunes, a song on Youtube or a game with a cool theme. Press the button again (which now has changed into a black square) to stop recording. Press the black triangle to check that you have actually recorded something.

Screen_shot_2012-10-02_at_17

Make sure that Soundflower (2ch) is selected as the Audio Source. Click on OK to go to the next panel and click on OK again. If you now choose the Browse tool and click on the button, you should hear your recording.

Step 4: set everything back to normal

You can now choose Quit Soundflowerbed from the Soundflower symbol in the menubar. This will disable all sound. In Audio Midi Setup, assign both types of sound output to Built-in Output instead of HyperStudio 5 Virtual Audio Device. Now you can hear all sounds again. In the Sound panel of the system preferences, you will want to make sure that Headphones or Internal Speakers are selected on the Output tab.

I tested this with Mac OS X 10.6.8 (Snow Leopard) and HyperStudio 5.2.1372. With a little additional tweaking, it also works to record Skype sessions.

Please, leave a comment if you have questions or know a better way to do this.